
Good day to you and thank you for coming back for another blog post. In our last post, we discussed drip irrigation and how it can help lessen our water consumption. With the price of water constantly rising, what if we are wanting to take it a step further and provide the input of water. There are a handful of ways to obtain your own water. One of the easiest we have found is the installation of a rain water harvesting system.
Basics of Rain Water Harvesting
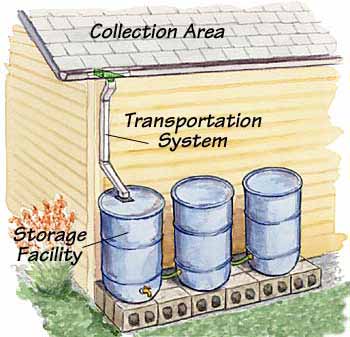
What is rain water harvesting? RWH is simply taking advantage of a large portion of a rood top structure and capturing the rain water that falls onto it. This is done with the use of rain gutters, channeling rain water thru first a filter or screen (to prevent debris and pollution), then being routed to a storage tank. Believe it or not, it is that simple.
Getting set up
- Gutters – Rain gutters are need to catch the rainwater when it falls to your roof. If you do not have rain gutters installed, seek out assistance from a local installer. When ours was installed I was involved the entire time as we only wanted the gutters for rain water harvesting. With that said I chose the largest surface areas, that would collect rainwater, to have gutters. This saved us money in materials and labor.
- Water Storage – you will need a way of storing your collected rainwater. This can be done with an array of options. Look for food grade quality and ensure no light can enter the container to prevent algae growth. One of the biggest things to consider is the capacity. You wouldn’t want to use a 50 gallon drum when you have a large garden or lawn to manage. This is where I fell short. I chose to only have one IBC Tote, holding 300 gallons of water. With a 1hp pump, that tote is empty within one hour! So definitely plan ahead here.
- Hook it all up – Once you have your gutters and tank installed, you will need to pipe everything in. We chose to use 3in PVC piping to achieve this. Flexible piping can be used as well. Ensure your screening process is implemented prior to the tank to prevent debris from settling on the bottom.
Other Things to Consider
A couple other things to think about before diving right in; location of tank, how you will get the water to the plants, air vents, and overflow valves.
Location – You are going to want to take the time and scope out the best location for the tank. Adding feet and feet of piping is silly when you an simply place your tank directly under you rainwater source.
Watering method – Depending on the size of you tank, you may or may not have enough pressure to water your plants efficiently. The purchase of a small pump for drip irrigation or a larger pump for a sprinkler set up may be needed.
Air ventilation – In the hot summer months, pressure can build or suction even when rain water is entering the tank. One way to prevent this is to have a section of pipe that is to be mounted vertically off of the pipe going to the storage tank.
Water Overflow – Lastly, you will need to incorporate an overflow pipe. Without this, water will flow over and out of the top of you tank leading to possible erosion issues.

Now Get Harvesting
I hope this gets you on your way to harvesting rain water. Please keep in mind, In North Carolina, rain water harvesting is both legal and ecouraged. Check with you local and state laws to ensure you are operating within the law. If you have any questions, feel free to leave a comment below and remember, life’s a garden… dig it!

Leave a comment